2025. 11. 14. 18:42ㆍ스프링 (Spring)/스프링 팁 (Spring Tip)
Spring Web Framework
Spring 웹 프레임워크는 크게 MVC와 WebFlux로 나눌 수 있습니다.
| MVC | WebFlux |
| Blocking Primitive, Collection Thread per Request Servlet API |
Non-Blocking Mono, Flux Event Loop Threads Reactive Stream API |
| DispatcherServlet | DispatcherHandler |

Spring MVC는 Tomcat, Jetty, Undertow 등 서블릿 기반의 웹서버에서 동작합니다.
하나의 요청에 하나의 스레드를 배정해주는 모델인데, 사실 이건 꽤나 부담스러운 작업입니다.
application properties 문서를 참고해보면, 기본 스레드 개수를 찾을 수 있습니다.
| server.jetty.threads.max | 200 | Maximum number of threads. Doesn't have an effect if virtual threads are enabled. |
| server.tomcat.threads.max | 200 | Maximum amount of worker threads. Doesn't have an effect if virtual threads are enabled. |
소규모 프로젝트에서 한 번에 200개가 다 차는 건 흔하지 않기 때문에, 여전히 MVC는 좋은 옵션이지만 -
대규모 공개 웹 서비스의 경우에는 터무니 없이 적습니다. 이때 스레드는 그 자체로 시스템 비용이 들기 때문에 무작정 max를 늘린다고 해결될 문제도 아니고요.
그렇게 Spring WebFlux가 탄생했습니다.
Overview :: Spring Framework
A natural question to ask but one that sets up an unsound dichotomy. Actually, both work together to expand the range of available options. The two are designed for continuity and consistency with each other, they are available side by side, and feedback f
docs.spring.io
소수의 스레드로, 많은 요청을 동시에 처리할 수 있는 모델이 필요했죠.
따라서 Node 진영에서 널리 쓰이던 이벤트 루프 기반의 논블록킹(non-blocking) 처리 방식을 채용했습니다.
또한 Java5부터 추가된 어노테이션과 Java8부터 추가된 람다 표현식으로 프레임워크를 완성도 있게 만들 수 있었죠.
마지막 단추로, 반응형(reactive) 프로그래밍 모델을 추가했습니다.
연산이 끝나거나, 데이터가 완성되면 - 알림을 보내고, 그제서야 처리할 수 있도록 만든 것이죠.
백프레셔(back pressure)가 데이터 흐름을 제어하기 때문에 알림을 받아도 바로 처리하지 않아도 됩니다.
자, 더 자세히 들여다볼까요.
Concept
최초에 클라이언트는 웹 서버(netty)에 요청을 보냅니다.
먼저 I/O 스레드(boss thread)가 받아서 여러 개의 이벤트 루프 스레드(event loop thread) 중 하나를 선택합니다.
그리고 선택된 이벤트 루프 스레드에 요청을 등록하면, 해당 스레드는 새로 소켓(socket)을 만들어 클라이언트와 연결합니다.
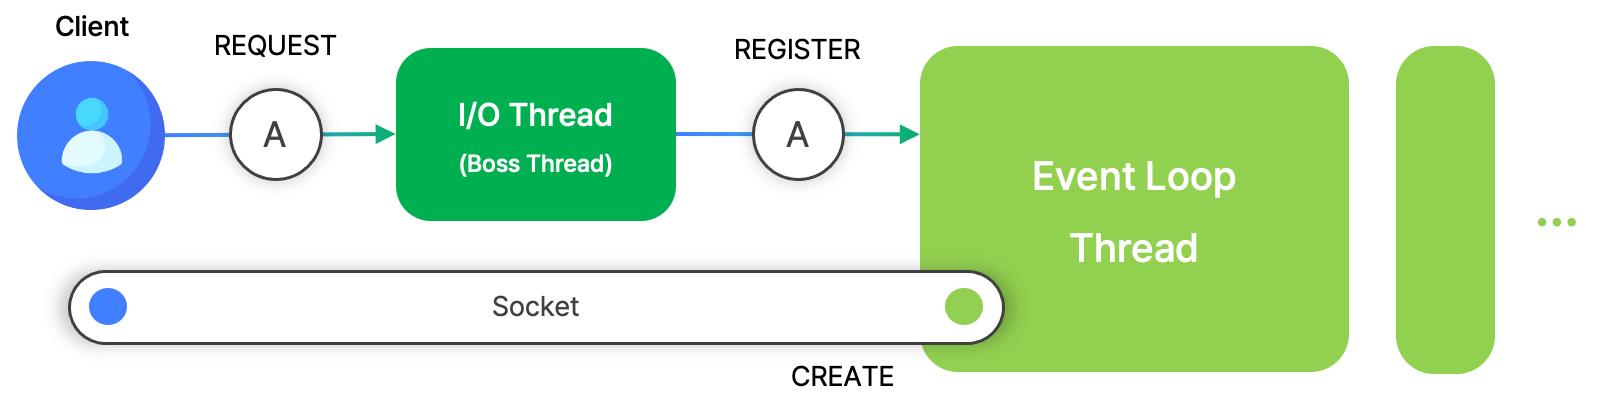
따라서 각 이벤트 루프 스레드는 내부적으로 많은 네트워크 소켓들을 가지고 있습니다.
그리고 클라이언트들은 본인과 연결된 소켓을 통해 요청 데이터를 전송합니다.
스레드 안에는 셀렉터(selector)가 있어서, 클라이언트로부터 요청 데이터가 다 도착했는 지 확인(polling)합니다.
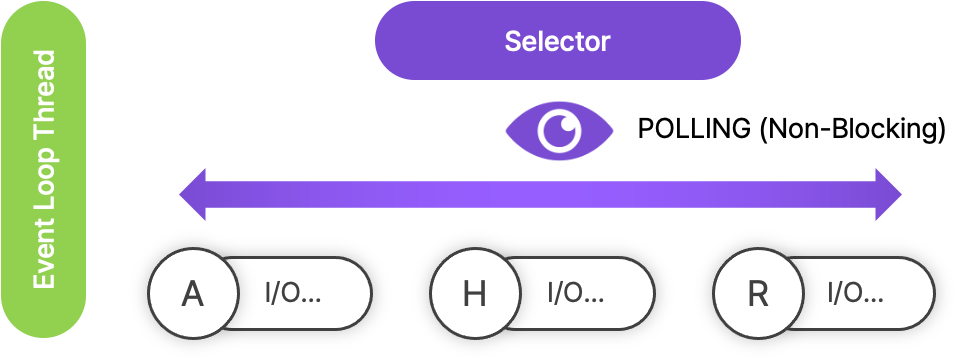
만일 어떤 소켓이 요청 데이터를 다 읽었다면, 셀렉터가 이를 감지합니다.
그리고 해당 데이터를 파이프라인(ChannelPipeline)을 통해 디스페처 핸들러(dispatcher handler)로 전달하죠.
참고로 파이프라인에서는 디코딩이나 집계 등 다양한 데이터 변환을 수행합니다.

디스페처 핸들러는 요청에 맞는 컨트롤러 메소드(handler)를 찾습니다.
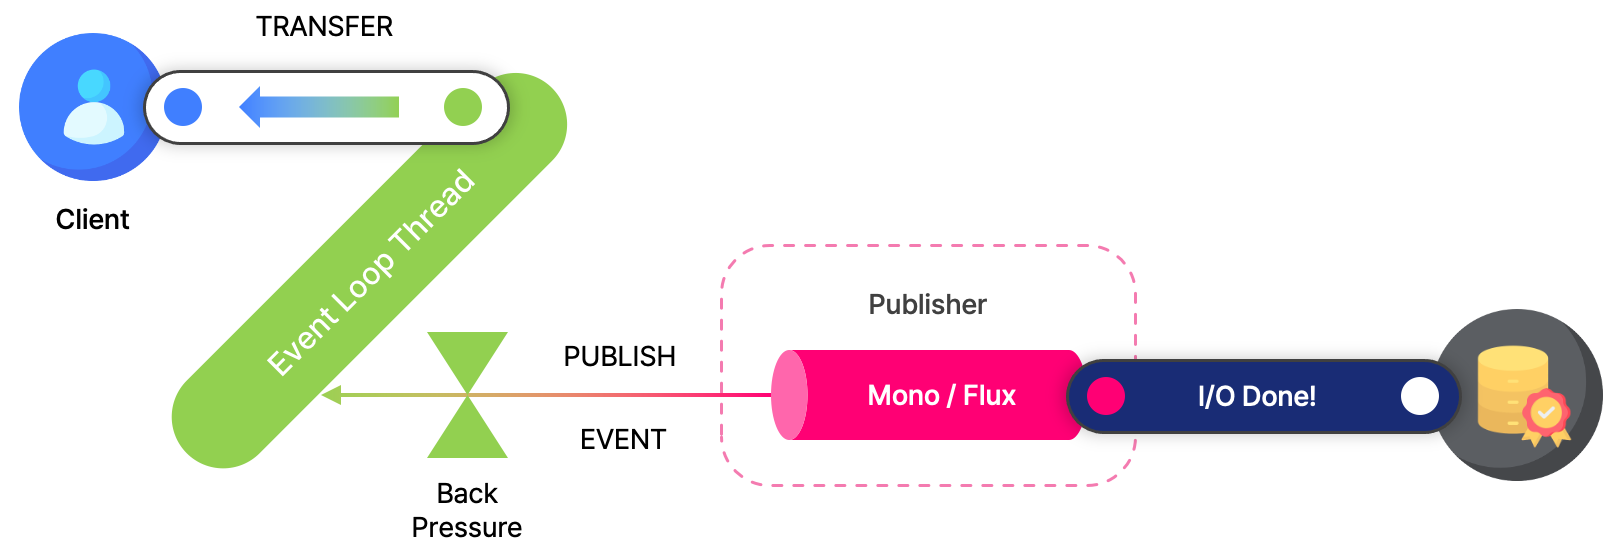
그리고 핸들러를 통해 반응형 스트리밍 자료형인 Mono 또는 Flux를 응답으로 하는 출판자(publisher)를 만들죠.
이벤트 루프 스레드는 해당 출판자를 구독(subscribe)해서, 데이터나 연산이 완료(event)되면 알림을 받도록 합니다.

출판자의 I/O가 끝나면 이벤트 루프 스레드에 알림(notification)을 보냅니다.
이때, 이벤트 루프 스레드는 해당 데이터를 읽어서 클라이언트에게 제공하죠.
여기에 백프레셔(back pressure)라는 개념이 등장하는데, 출판자가 데이터를 제공하는 양이 구독하는 입장에서 처리하기 버겁다면 전송 속도를 늦추거나 대기할 수 있도록 해줍니다.
Practice
이제 한번 사용해보죠.
mongodb를 사용할 것이며, 데이터는 아래 글에서 소개된 것을 다시 사용할 겁니다.
Spring MVC에서 스트리밍하기
With MVC Spring MVC는 하나의 요청에 대한 하나의 스레드를 사용하는 블로킹(blocking) 방식 모델로,트랜잭션이나 비즈니스 로직에 알맞기 때문에 - 일반적으로 사용됩니다. 사실 스트리밍에 특화된 프
oimbook.tistory.com
설정을 다음과 같이 해줍니다.
implementation(group = "org.springframework.boot", name = "spring-boot-starter-webflux")
implementation(group = "org.springframework.boot", name = "spring-boot-starter-data-mongodb-reactive")
먼저 엔티티부터 만들어보겠습니다.
레포지토리는 WebFlux에 특화된 ReactiveMongoRepository를 사용했습니다.
import org.springframework.data.annotation.Id
import org.springframework.data.mongodb.core.mapping.Document
import org.springframework.data.mongodb.core.mapping.Field

@Document(collection = "youtube_trends")
class YoutubeTrend(
    @Id val id: String? = null,
    @Field("category_id") val categoryId: String,
    @Field("channel_title") val channelTitle: String,
    @Field("comment_count") val commentCount: Int,
    @Field("comments_disabled") val commentDisabled: Boolean,
    @Field("description") val description: String,
    @Field("dislikes") val dislikes: Int,
    @Field("likes") val likes: Int,
    @Field("publish_time") val publishTime: String,
    @Field("ratings_disabled") val ratingsDisabled: Boolean,
    @Field("tags") val tags: String,
    @Field("thumbnail_link") val thumbnailLink: String,
    @Field("title") val title: String,
    @Field("video_error_or_removed") val videoErrorOrRemoved: Boolean,
    @Field("video_id") val videoId: String,
    @Field("views") val views: Int,
)
import org.springframework.data.mongodb.repository.ReactiveMongoRepository
import reactor.core.publisher.Flux
interface YoutubeTrendRepository : ReactiveMongoRepository<YoutubeTrend, String> {
fun findAllByLikesGreaterThan(likes: Int): Flux<YoutubeTrend>
}findAllByLikesGreaterThan(likes: Int) 함수는 likes 개수가 몇 개 초과인 것만 결과로 주도록 하는 쿼리입니다.
이어서 서비스도 만들어줍니다.
사실 mongodb 컬렉션에는 중복 데이터가 있기 때문에, distinct()를 추가했습니다.
import reactor.core.publisher.Flux
import reactor.core.publisher.Mono

interface ChannelService {

    fun countChannelTitlesByLikesGreaterThan(likes: Int): Mono<Long>

    fun findChannelTitlesByLikesGreaterThan(likes: Int): Flux<String>

}
import oai.playground.infra.database.mongo.youtube.YoutubeTrendRepository
import org.springframework.stereotype.Service
import org.springframework.transaction.annotation.Transactional
import reactor.core.publisher.Flux
import reactor.core.publisher.Mono
@Service
class ChannelServiceImpl(
private val youtubeTrendRepository: YoutubeTrendRepository
) :
ChannelService {
@Transactional(readOnly = true)
override fun countChannelTitlesByLikesGreaterThan(likes: Int): Mono<Long> =
youtubeTrendRepository.findAllByLikesGreaterThan(likes = likes)
.map { it.channelTitle }
.distinct()
.count()
@Transactional(readOnly = true)
override fun findChannelTitlesByLikesGreaterThan(likes: Int): Flux<String> =
youtubeTrendRepository.findAllByLikesGreaterThan(likes = likes)
.map { it.channelTitle }
.distinct()
}서두에서 언급했듯 Mono 또는 Flux를 반환값으로 사용했습니다.
- Mono는 단수 자료형(String, Int, Float 등)을 담아서 보낼 때 사용하고,
- Flux는 복수 자료형(List, Set 등)을 담아서 보낼 때 사용합니다.
마지막으로 컨트롤러 메소드를 만들어줍니다.
(참고로 Flux<String>의 경우 ["a", "b", "c"]로 보내면, 응답 데이터로 ["a", "b", "c"]가 오는 게 아닌 abc 가 옵니다. 따라서 map을 추가해야 되었습니다.)
@RestController
@RequestMapping("/youtube/channel-titles")
class YoutubeChannelTitleController(
    private val channelService: ChannelService
) {

    @GetMapping("", produces = [MediaType.APPLICATION_JSON_VALUE])
    fun findChannelTitlesByLikesGreaterThan(@RequestParam likes: Int): Flux<String> =
        channelService.findChannelTitlesByLikesGreaterThan(likes = likes).map { "\"$it\"," }

    @GetMapping("/count")
    fun countChannelTitlesByLikesGreaterThan(@RequestParam likes: Int): Mono<Long> =
        channelService.countChannelTitlesByLikesGreaterThan(likes = likes)

}
이제 파이썬으로 요청을 보내보겠습니다.
먼저 Mono를 받는 요청 예시입니다.
start_time = datetime.now()
url = "http://localhost:8080/youtube/channel-titles/count?likes=1000000"
response: Response = requests.get(url=url)
item_count = response.json()
duration = datetime.now() - start_time
print(f"Items : {item_count:,} numbers -> Took {duration.total_seconds():0.3f} seconds")
Items : 48 numbers -> Took 1.122 seconds
그리고 Flux를 받는 요청 예시입니다.
start_time = datetime.now()
url = "http://localhost:8080/youtube/channel-titles?likes=1000000"
response: Response = requests.get(url=url)
items = json.loads("[" + response.content.decode()[:-1] + "]")
duration = datetime.now() - start_time
print(f"Items : {len(items):,} numbers -> Took {duration.total_seconds():0.3f} seconds")
print(items[:5], "...")
Items : 48 numbers -> Took 1.126 seconds
['SMTOWN', 'MigosVEVO', 'elrubiusOMG', 'Dude Perfect', 'LuisFonsiVEVO'] ...
여기까지 보면 알겠지만, 클라이언트 입장에서는 스트리밍을 사용하지 않으면 MVC와 같이 기다렸다가 데이터를 받아야 합니다.
그럼 한 번 스트리밍 메소드도 추가해봅시다.
적용하는 법은 간단합니다. ContentType만 수정해주면 되죠.
    @GetMapping("/streaming", produces = [MediaType.TEXT_EVENT_STREAM_VALUE])
    fun streamChannelTitlesByLikesGreaterThan(@RequestParam likes: Int): Flux<String> =
        channelService.findChannelTitlesByLikesGreaterThan(likes = likes)
items = list()
logs = list()
with requests.get(url="http://localhost:8080/youtube/channel-titles/streaming?likes=1000000", stream=True) as response:
response.raise_for_status()
for line in response.iter_lines(decode_unicode=True):
if not line.startswith("data:"):
continue
logs.append(datetime.now())
items.append(line[5:])
print(f"log count : {len(logs):,} -> item count : {len(items):,}")
print(list(map(lambda log: log.strftime("%S.%f"),logs[:5])), "...")
print(items[:5], "...")log count : 48 -> item count : 48
['10.823714', '10.823739', '10.823774', '10.823797', '10.823807'] ...
['SMTOWN', 'MigosVEVO', 'elrubiusOMG', 'Dude Perfect', 'LuisFonsiVEVO'] ...
이제 기다릴 필요 없이 데이터를 스트리밍으로 바로 받을 수 있네요!
'스프링 (Spring) > 스프링 팁 (Spring Tip)' 카테고리의 다른 글
| Spring MVC에서 스트리밍하기 (0) | 2025.11.12 |
|---|---|
| Redis로 분산 캐시 사용해보기 (0) | 2025.11.09 |
| Caffeine으로 로컬 캐시 탐험하기 (0) | 2025.11.09 |
| 간단히 캐시 사용해보기 (1) | 2025.11.08 |
| Kotlin 플러그인 All-open 파헤치기 (feat, JPA Fetch) (0) | 2024.05.18 |