2024. 7. 13. 02:43ㆍ스프링 (Spring)/스프링 보안 (Spring Security)
본 장은 아래 문서를 참고해서 작성했습니다.
Persisting Authentication :: Spring Security
The first time a user requests a protected resource, they are prompted for credentials. One of the most common ways to prompt for credentials is to redirect the user to a log in page. A summarized HTTP exchange for an unauthenticated user requesting a prot
docs.spring.io
Session
세션은 일정 기간 또는 어떤 일을 완료할 때까지 유지되는 사용자 행동 단위입니다. (출처 : wikipedia)
예를 들어 메일함에 있는 메일을 확인하기 위해서는 본인 인증 과정을 거쳐야 합니다. (통칭 로그인)
세션이 없다면 메일함에 있는 메일을 누를 때마다 매번 로그인을 해야겠죠.
만약 1시간 단위의 세션이 있다면, 처음 로그인 한 후 1시간 동안은 메일을 자유롭게 확인할 수 있습니다.
Spring Security에서는 기본적으로 이러한 세션을 다루고 있습니다.
상식적으로 생각하기로는 당연히 세션을 식별할 키(key)가 있어야 겠고
세션이 언제 끝나는 지, 그리고 로그아웃 같은 액션을 통해 세션을 닫아야 할 수도 있겠죠.
하지만 가장 중요한 건, 세션을 통해 어떤 사용자인지 알 수 있어야 한다는 것입니다.
내가 메일을 작성할 때 자동으로 '보낸 사람'에 본인의 이메일이 등장하는 것과 마찬가지죠.
즉, 세션의 생명주기를 관리할 뿐만 아니라 이에 수반되는 사용자 정보도 함께 저장하거나 읽을 수 있어야 합니다.
따라서 이 글의 주제를 바라볼 때, 세션에만 국한된 것이 아니라 요청에 담겨져 있는 정보로 확장해주면 편합니다.
Persistence
필자가 말하고자 하는 영속성(persistence)이 무엇인지 예시를 통해 살펴보죠.
(출처 : Spring Security - SAMPLES)

로그인에 성공한 후, 페이지를 옮겨도 인증 정보가 그대로 남아있음을 알 수 있습니다.
그리고 한 번 인증에 성공하면 보안 페이지를 계속 방문할 수 있죠.
따라서 로그인에 성공했을 때 사용자 인증 정보가 어딘가 저장되고, 매 페이지(요청)마다 재사용되고 있음이 틀림없습니다.
이 메커니즘은 이해하기 조금 까다로우므로 천천히 읽으시길 권장드립니다.
When is configured?
뭐가 되었든 Spring Security - Servlet 글에서 소개한 구조를 벗어나지 않습니다.
모든 건 FilterChain에서 등록되기 때문이죠.
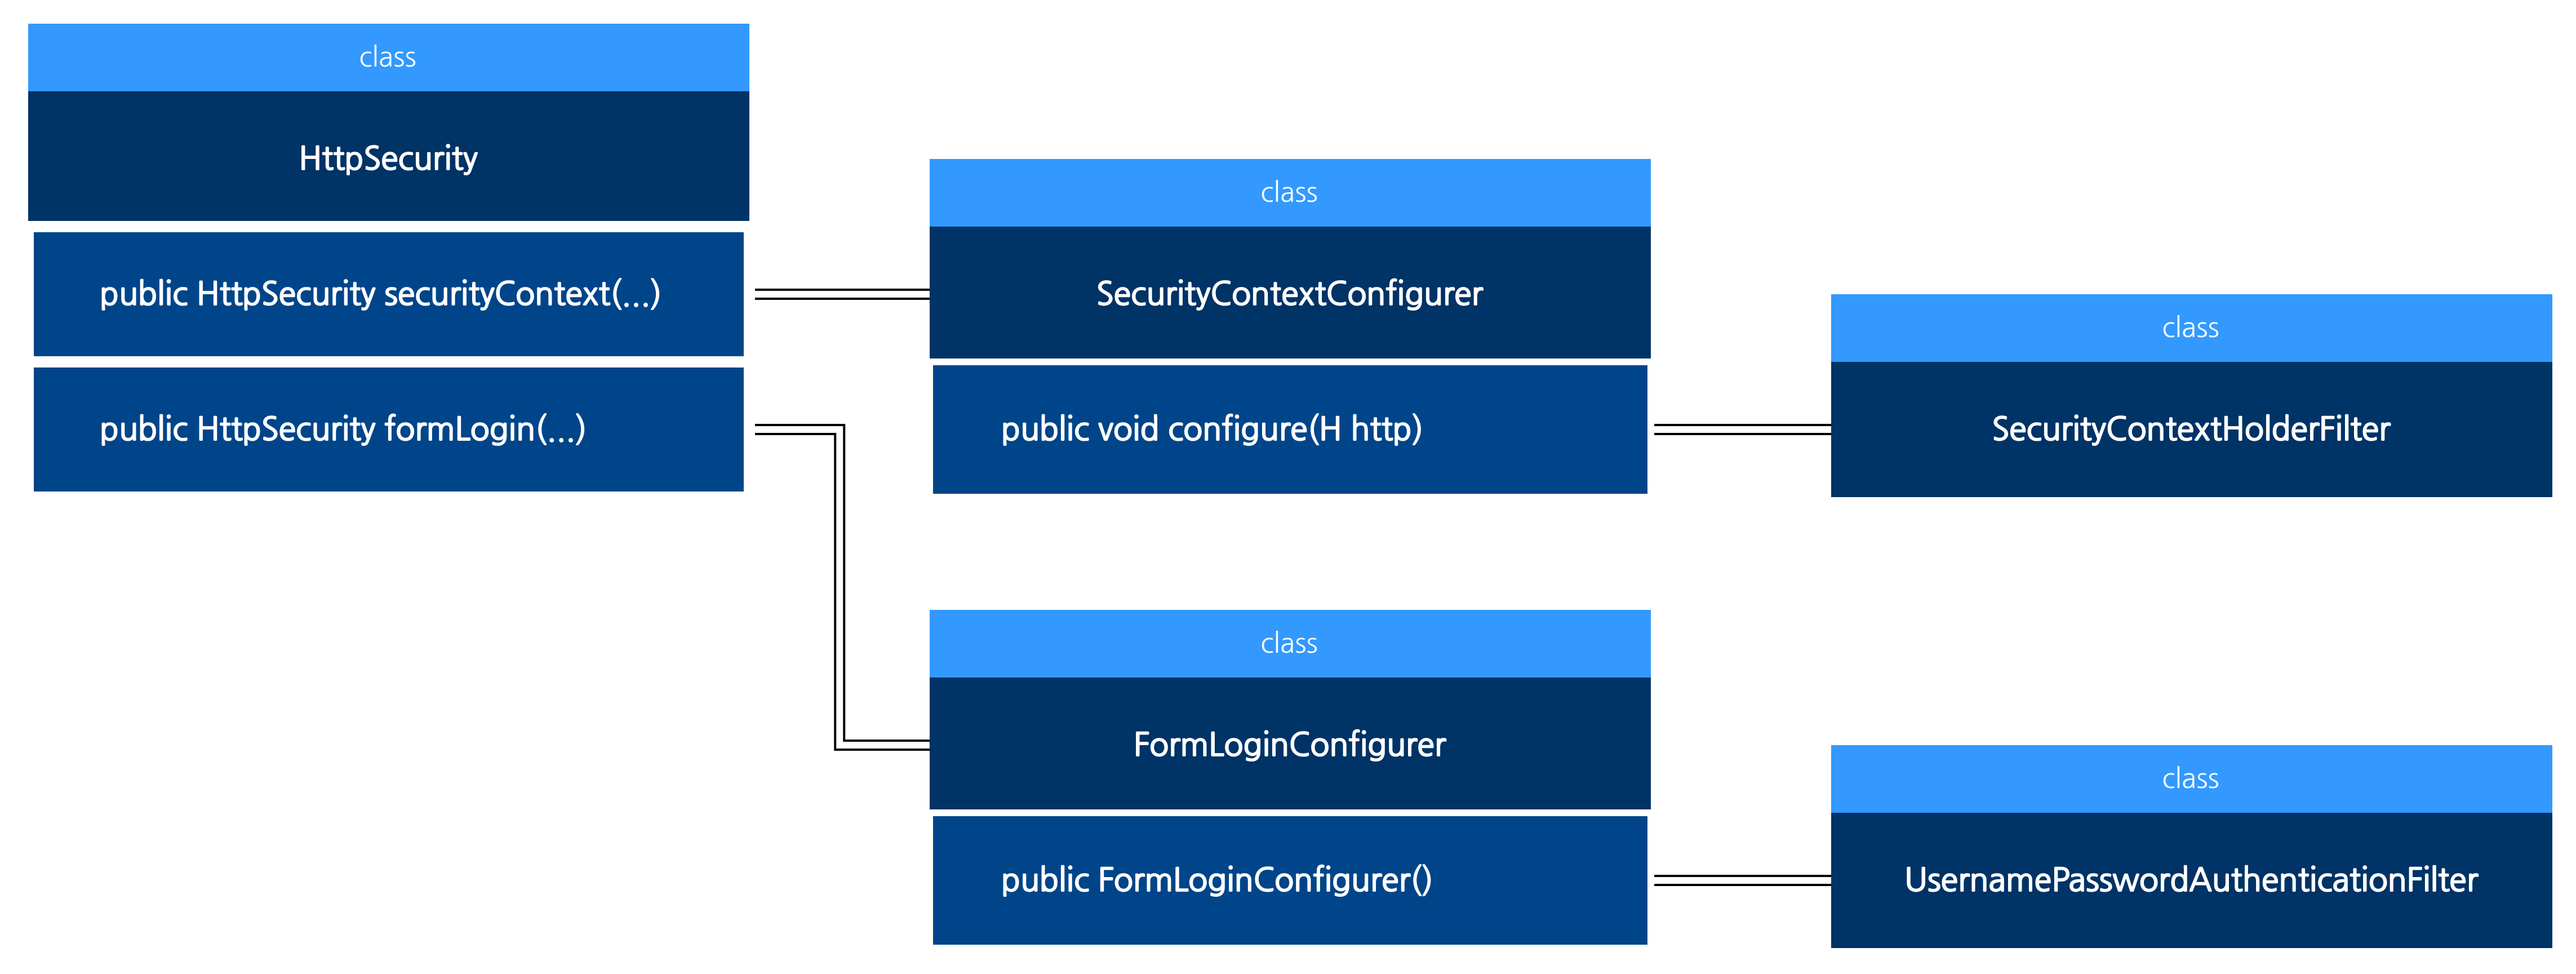
따라서 예제에서 SecurityConfig.kt를 방문해보면 HttpSecurity라는 빌더가 보입니다.
package org.springframework.security.samples.config

import ...

class SecurityConfig {

    @Bean
    fun filterChain(http: HttpSecurity): SecurityFilterChain {
        http {
            authorizeRequests {
                authorize("/css/**", permitAll)
                authorize("/user/**", hasAuthority("ROLE_USER"))
            }
            formLogin {
                loginPage = "/log-in"
            }
        }
        return http.build()
    }

    ...
Bean 함수를 보면 아래와 같죠.
package org.springframework.security.config.annotation.web.configuration;

import ...

@Configuration(proxyBeanMethods = false)
class HttpSecurityConfiguration {
    ...

    @Bean(HTTPSECURITY_BEAN_NAME)
    @Scope("prototype")
    HttpSecurity httpSecurity() throws Exception {
        ...

        http
            .csrf(withDefaults())
            .addFilter(webAsyncManagerIntegrationFilter)
            .exceptionHandling(withDefaults())
            .headers(withDefaults())
            .sessionManagement(withDefaults())
            .securityContext(withDefaults())
            .requestCache(withDefaults())
            .anonymous(withDefaults())
            .servletApi(withDefaults())
            .apply(new DefaultLoginPageConfigurer<>());
        http.logout(withDefaults());
        applyCorsIfAvailable(http);
        applyDefaultConfigurers(http);
        return http;
    }

    ...
아직은 기본값들을 일일이 보지 않아도 됩니다.
결과론적으로, 빌드된 필터를 보기위해 다음과 같이 filterChain() 함수의 마지막 줄을 아래처럼 고치고 실행해봅니다.
package org.springframework.security.samples.config

import ...

class SecurityConfig {

    @Bean
    fun filterChain(http: HttpSecurity): SecurityFilterChain {
        ...

        val httpFilterChain: DefaultSecurityFilterChain = http.build()
        httpFilterChain.filters.map { filter ->
            println(filter)
        }
        return http.build()
    }

    ...
결과를 보면 아래처럼 필터들이 출력됩니다.
org.springframework.security.web.session.DisableEncodeUrlFilter@5b47731f
org.springframework.security.web.context.request.async.WebAsyncManagerIntegrationFilter@233db8e9
org.springframework.security.web.context.SecurityContextHolderFilter@68d6d775
org.springframework.security.web.header.HeaderWriterFilter@63300c4b
org.springframework.security.web.csrf.CsrfFilter@6ef60295
org.springframework.security.web.authentication.logout.LogoutFilter@d675f9f
org.springframework.security.web.authentication.UsernamePasswordAuthenticationFilter@7e4579c7
org.springframework.security.web.savedrequest.RequestCacheAwareFilter@45c9b3
org.springframework.security.web.servletapi.SecurityContextHolderAwareRequestFilter@38b3f208
org.springframework.security.web.authentication.AnonymousAuthenticationFilter@40c2ce52
org.springframework.security.web.access.ExceptionTranslationFilter@2577a95d
org.springframework.security.web.access.intercept.FilterSecurityInterceptor@66a5755
눈치챘겠지만, 굵은 글씨로 표현된 두 필터가 영속성의 핵심 역할입니다.
이 두 필터는 http.build() 함수가 실행될 때, 아래 doBuild() 함수 호출로 인해 등록됩니다.
package org.springframework.security.config.annotation;

import ...

public abstract class AbstractConfiguredSecurityBuilder<O, B extends SecurityBuilder<O>>
        extends AbstractSecurityBuilder<O> {
    ...

    @Override
    protected final O doBuild() throws Exception {
        synchronized (this.configurers) {
            this.buildState = BuildState.INITIALIZING;
            beforeInit();
            init();
            this.buildState = BuildState.CONFIGURING;
            beforeConfigure();
            configure();
            this.buildState = BuildState.BUILDING;
            O result = performBuild();
            this.buildState = BuildState.BUILT;
            return result;
        }
    }

    ...
How save the authentication?
인증 정보를 저장하기 위해서는, 일단 인증 정보라는게 있어야 겠죠?
그리고 이건 로그인에 성공할 때 생길 것이라는 건 상식적으로 알고 있습니다.
그래서 UsernamePasswordAuthenticationFilter를 봅니다.
부모 클래스인 AbstractAuthenticationProcessingFilter 추상 클래스의 doFilter() 함수를 보면,
인증 결과에 따라 successfulAuthentication() 또는 unsuccessfulAuthentication() 함수를 호출합니다.
package org.springframework.security.web.authentication;

import ...

public abstract class AbstractAuthenticationProcessingFilter extends GenericFilterBean
        implements ApplicationEventPublisherAware, MessageSourceAware {
    ...

    private void doFilter(HttpServletRequest request, HttpServletResponse response, FilterChain chain)
            throws IOException, ServletException {
        if (!requiresAuthentication(request, response)) {
            chain.doFilter(request, response);
            return;
        }
        try {
            Authentication authenticationResult = attemptAuthentication(request, response);
            if (authenticationResult == null) {
                // return immediately as subclass has indicated that it hasn't completed
                return;
            }
            this.sessionStrategy.onAuthentication(authenticationResult, request, response);
            // Authentication success
            if (this.continueChainBeforeSuccessfulAuthentication) {
                chain.doFilter(request, response);
            }
            successfulAuthentication(request, response, chain, authenticationResult);
        }
        catch (InternalAuthenticationServiceException failed) {
            this.logger.error("An internal error occurred while trying to authenticate the user.", failed);
            unsuccessfulAuthentication(request, response, failed);
        }
        catch (AuthenticationException ex) {
            // Authentication failed
            unsuccessfulAuthentication(request, response, ex);
        }
    }

    ...
그리고 타고 내려가다보면, 구현부를 볼 수 있습니다.
    ...

    protected void successfulAuthentication(HttpServletRequest request, HttpServletResponse response, FilterChain chain,
            Authentication authResult) throws IOException, ServletException {
        SecurityContext context = this.securityContextHolderStrategy.createEmptyContext();
        context.setAuthentication(authResult);
        this.securityContextHolderStrategy.setContext(context);
        this.securityContextRepository.saveContext(context, request, response);
        if (this.logger.isDebugEnabled()) {
            this.logger.debug(LogMessage.format("Set SecurityContextHolder to %s", authResult));
        }
        this.rememberMeServices.loginSuccess(request, response, authResult);
        if (this.eventPublisher != null) {
            this.eventPublisher.publishEvent(new InteractiveAuthenticationSuccessEvent(authResult, this.getClass()));
        }
        this.successHandler.onAuthenticationSuccess(request, response, authResult);
    }

    protected void unsuccessfulAuthentication(HttpServletRequest request, HttpServletResponse response,
            AuthenticationException failed) throws IOException, ServletException {
        this.securityContextHolderStrategy.clearContext();
        this.logger.trace("Failed to process authentication request", failed);
        this.logger.trace("Cleared SecurityContextHolder");
        this.logger.trace("Handling authentication failure");
        this.rememberMeServices.loginFail(request, response);
        this.failureHandler.onAuthenticationFailure(request, response, failed);
    }

    ...
중요한 라인은 바로 this.securityContextRepository.saveContext(context, request, response); 입니다.
해당 SecurityContextRepository에 SecurityContext가 저장되기 때문이죠.
이 Repository 변수는 기본적으로 DelegatingSecurityContextRepository 입니다.
어렵게 생각할 필요 없이 2개 이상의 동일한 SecurityContextRepository를 리스트(List)로 가지고
saveContext, loadContext 등의 함수를 호출하면 for 반복문을 통해 리스트 함수를 똑같이 호출해주는 겁니다.
package org.springframework.security.web.context;

import ...

public final class DelegatingSecurityContextRepository implements SecurityContextRepository {
    ...

    @Override
    public SecurityContext loadContext(HttpRequestResponseHolder requestResponseHolder) {
        SecurityContext result = null;
        for (SecurityContextRepository delegate : this.delegates) {
            SecurityContext delegateResult = delegate.loadContext(requestResponseHolder);
            if (result == null || delegate.containsContext(requestResponseHolder.getRequest())) {
                result = delegateResult;
            }
        }
        return result;
    }

    @Override
    public void saveContext(SecurityContext context, HttpServletRequest request, HttpServletResponse response) {
        for (SecurityContextRepository delegate : this.delegates) {
            delegate.saveContext(context, request, response);
        }
    }

    ...
여튼 이 delegates는 HttpSessionSecurityContextRepository, RequestAttributeSecurityContextRepository 입니다.
중요한 건 HttpSessionSecurityContextRepository 클래스의 saveContext() 함수인데,
package org.springframework.security.web.context;

import ...

public class HttpSessionSecurityContextRepository implements SecurityContextRepository {
    ...

    @Override
    public void saveContext(SecurityContext context, HttpServletRequest request, HttpServletResponse response) {
        SaveContextOnUpdateOrErrorResponseWrapper responseWrapper = WebUtils.getNativeResponse(response,
                SaveContextOnUpdateOrErrorResponseWrapper.class);
        if (responseWrapper == null) {
            saveContextInHttpSession(context, request);
            return;
        }
        responseWrapper.saveContext(context);
    }

    private void saveContextInHttpSession(SecurityContext context, HttpServletRequest request) {
        if (isTransient(context) || isTransient(context.getAuthentication())) {
            return;
        }
        SecurityContext emptyContext = generateNewContext();
        if (emptyContext.equals(context)) {
            HttpSession session = request.getSession(false);
            removeContextFromSession(context, session);
        }
        else {
            boolean createSession = this.allowSessionCreation;
            HttpSession session = request.getSession(createSession);
            setContextInSession(context, session);
        }
    }

    ...
saveContextInHttpSession() 함수의 else 부분을 보면 session을 가져와 SecurityContext를 저장합니다.
한 가지 재밌는 점은, 여기 어디에도 캐싱이나 Map 같이 세션을 저장하는 코드가 없다는 것입니다.
(사실 재밌다는 건 거짓말이고... 필자가 가장 헷갈렸던 부분이었네요.)
그럼에도 불구하고 우리가 페이지를 옮겨다녀도 세션이 유지되는 이유는,
웹 서버가 요청의 HttpSession 객체를 재사용하기 때문입니다. (= 매번 생성하지 않습니다)
따라서 HttpSession 객체가 유지되는 동안에는 영속성을 가질 수 있었습니다.
How load the authentication?
HttpSessionSecurityContextRepository에서 SecurityContext를 저장했다면, 로드하는 것도 마찬가지겠죠.
package org.springframework.security.web.context;

import ...

public class HttpSessionSecurityContextRepository implements SecurityContextRepository {
    ...

    @Override
    public SecurityContext loadContext(HttpRequestResponseHolder requestResponseHolder) {
        HttpServletRequest request = requestResponseHolder.getRequest();
        HttpServletResponse response = requestResponseHolder.getResponse();
        HttpSession httpSession = request.getSession(false);
        SecurityContext context = readSecurityContextFromSession(httpSession);
        if (context == null) {
            context = generateNewContext();
            if (this.logger.isTraceEnabled()) {
                this.logger.trace(LogMessage.format("Created %s", context));
            }
        }
        if (response != null) {
            SaveToSessionResponseWrapper wrappedResponse = new SaveToSessionResponseWrapper(response, request,
                    httpSession != null, context);
            wrappedResponse.setSecurityContextHolderStrategy(this.securityContextHolderStrategy);
            requestResponseHolder.setResponse(wrappedResponse);
            requestResponseHolder.setRequest(new SaveToSessionRequestWrapper(request, wrappedResponse));
        }
        return context;
    }
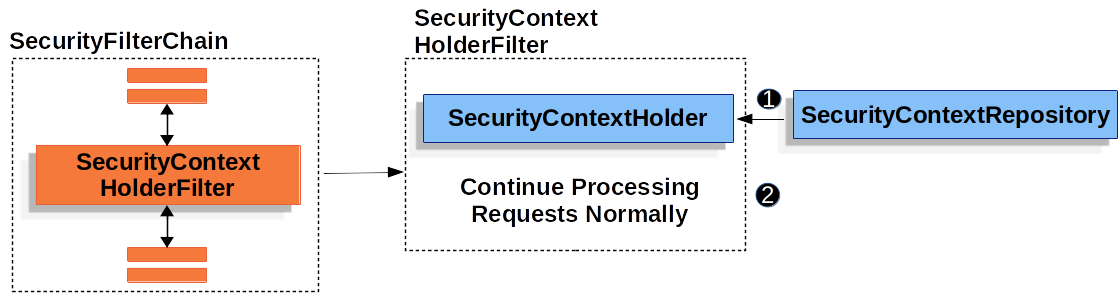
request.getSession(false) 함수를 통해 현재 요청에서 세션을 불러오고,
readSecurityContextFromSession(httpSession)을 통해 SecurityContext를 불러옵니다.
그리고 이 로직은 SecurityContextHolderFilter에 의해 이루어집니다.
package org.springframework.security.web.context;

import ...

public class SecurityContextHolderFilter extends GenericFilterBean {
    ...

    private void doFilter(HttpServletRequest request, HttpServletResponse response, FilterChain chain)
            throws ServletException, IOException {
        if (request.getAttribute(FILTER_APPLIED) != null) {
            chain.doFilter(request, response);
            return;
        }
        request.setAttribute(FILTER_APPLIED, Boolean.TRUE);
        Supplier<SecurityContext> deferredContext = this.securityContextRepository.loadDeferredContext(request);
        try {
            this.securityContextHolderStrategy.setDeferredContext(deferredContext);
            chain.doFilter(request, response);
        }
        finally {
            this.securityContextHolderStrategy.clearContext();
            request.removeAttribute(FILTER_APPLIED);
        }
    }

    ...
이 과정을 쉽게 도식화하면 아래와 같습니다.
Stateless Session
세션을 유지할 필요가 없을 때, 즉 세션에 상태값을 저장하지 않고 싶을 때
SessionCreationPolicy.STATELESS 를 적용합니다.
...
class SecurityConfig {

    @Bean
    fun filterChain(http: HttpSecurity): SecurityFilterChain {
        http {
            ...
            sessionManagement {
                sessionCreationPolicy = SessionCreationPolicy.STATELESS
            }
        }
        return http.build()
    }
이렇게 만들면 사용자는 매요청마다 재인증을 해야됩니다.

이는 일전에 소개했던 HttpSessionSecurityContextRepository를 사용하지 않고,
NullSecurityContextRepository를 사용하기 때문인데
package org.springframework.security.web.context;

import

public final class NullSecurityContextRepository implements SecurityContextRepository {
    ...

    @Override
    public SecurityContext loadContext(HttpRequestResponseHolder requestResponseHolder) {
        return this.securityContextHolderStrategy.createEmptyContext();
    }

    @Override
    public void saveContext(SecurityContext context, HttpServletRequest request, HttpServletResponse response) {
    }

    ...
loadContext(), saveContext() 함수를 보면 아무것도 하지 않는 걸 알 수 있습니다.
Logout
우리가 익히 아는 그 로그아웃이 맞습니다. 사용자 인증 정보를 깔끔히 지우는 일이죠.
이는 LogoutFilter에서 수행합니다.
doFilter() 내용을 보면, this.handler.logout(...) 을 통해 핵심 로직이 동작하는데,
package org.springframework.security.web.authentication.logout;

import ...

public class LogoutFilter extends GenericFilterBean {
    ...

    private void doFilter(HttpServletRequest request, HttpServletResponse response, FilterChain chain)
            throws IOException, ServletException {
        if (requiresLogout(request, response)) {
            Authentication auth = this.securityContextHolderStrategy.getContext().getAuthentication();
            if (this.logger.isDebugEnabled()) {
                this.logger.debug(LogMessage.format("Logging out [%s]", auth));
            }
            this.handler.logout(request, response, auth);
            this.logoutSuccessHandler.onLogoutSuccess(request, response, auth);
            return;
        }
        chain.doFilter(request, response);
    }

    ...
여기 hander는 CompositeLogoutHandler로 일전의 DelegatingSecurityContextRepository와 마찬가지로
2개 이상의 LogoutHandler를 for 반복문을 통해 동작하도록 하는 것입니다.
모두 나열하기는 어렵고, 대표적으로 SecurityContextLogoutHandler를 보자면,
package org.springframework.security.web.authentication.logout;

import ...

public class SecurityContextLogoutHandler implements LogoutHandler {
    ...

    @Override
    public void logout(HttpServletRequest request, HttpServletResponse response, Authentication authentication) {
        ...
        SecurityContext context = this.securityContextHolderStrategy.getContext();
        this.securityContextHolderStrategy.clearContext();
        if (this.clearAuthentication) {
            context.setAuthentication(null);
        }
        SecurityContext emptyContext = this.securityContextHolderStrategy.createEmptyContext();
        this.securityContextRepository.saveContext(emptyContext, request, response);
    }

    ...
이미 있던 SecurityContext를 가져와 깔끔히 지우는 걸 확인할 수 있습니다.
'스프링 (Spring) > 스프링 보안 (Spring Security)' 카테고리의 다른 글
| Spring Security - Authentication (0) | 2024.07.07 |
|---|---|
| Spring Security - Servlet이란? (0) | 2024.07.06 |
| Spring Security - 개요 (0) | 2024.07.04 |